Monday, December 13, 2010

Christmas People


 OK Etsy has a cool blog that I love ! Its called Get the Look Decor ( here is the one from this week) , its one of those things like going on a home tour at Christmas only  it is year round. I don't know how these people are picked to be featured , but basically they take pictures of the nifty things and decor around their home and post on etsy. Isnt it  so fun to look in other peoples houses...A peep in the window as you walk by, a glance in the living room while standing at the front door. I even go as far as placing my own furniture in my mind imagining if I lived there! Come on...you know you do it.!

Anyway one of said blogs had a picture of some dolls ( i think thats what you might call them). They were made from  old wooden thread bobbins, which I happen to have a plethora of! Here is a picture of the ones on Etsy. I knew I had to make these. Of course it was months ago that this got added to my To Do list of crafts, But I finally got around to it! Yeah, one thing crossed off!


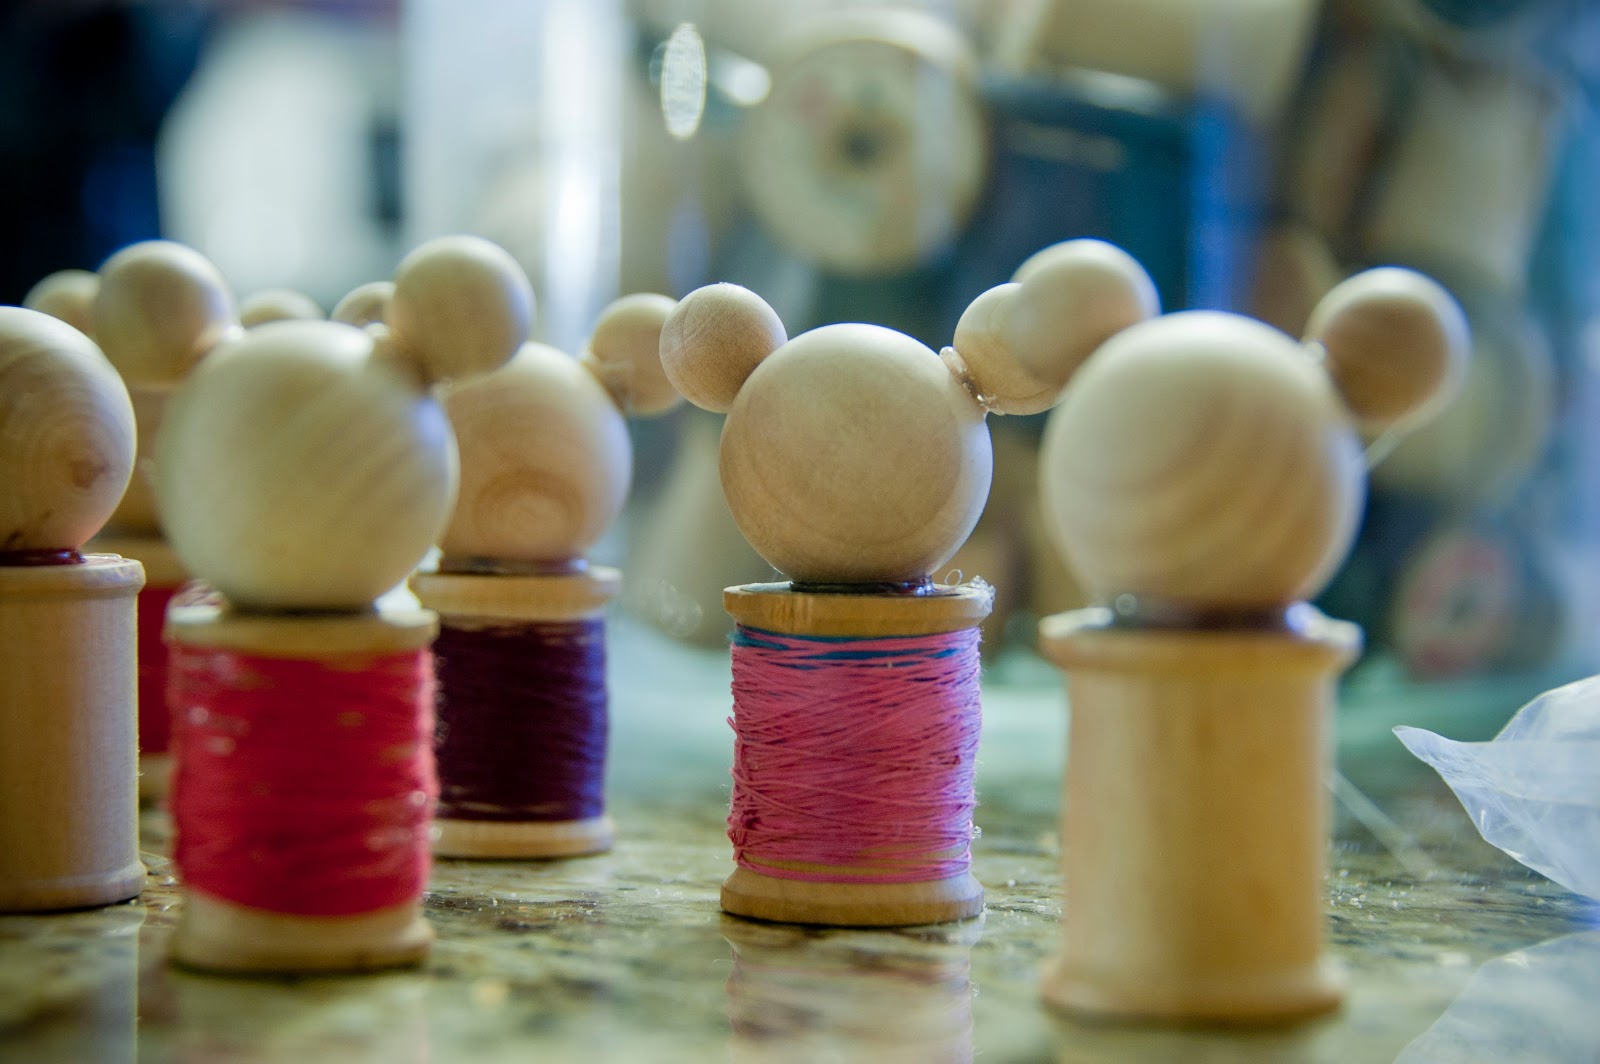
So I started with some old bobbins I got on Ebay, some already had thread on them.


I glued on their heads, which are just  small wood balls I got at Michaels. And I added pig tails to the girls, which agian are mini wooden balls from Michaels. For the naked ones I added thread by adding a drop of hot glue and wrapping them with thread I had already. I wanted to use  "approved" christmas colors ( trying something new this year, but have met strong resistance to only using Blue and Green for christmas) But I ended up using other colors to make my assistant happy.


Next we gave them faces using sharpies, I thought this would be ALOT easier then trying to paint on faces! BUT,  I did get yelled at by my assistant stating that the boys look too girlie, but I ask How do you make lips with out color?? I tried .....


Then we gave them hair..  This guy got a Mohawk!


This guy has lost a little hair on top!


Here are the Girlie Girls.


I do intend to put ribbon around their pig tails, but I havent gotten that far yet! I will update you if I do..

I think they turned out pretty well ?? I have favorites , but I dont tell them who they are! ( I love you all the same!)

Hope your holidays aren't driving you bonkers...

~Bianca


Saturday, November 13, 2010

Kids, Park and Photoshop


Sooo,  I have been taking this Photography class at the JC and I have to tell you how much I love it! My theory on Photography has always been that if I can get a great photo then why do I need photoshop? I have a pretty good camera too ( Nikon D70S with a 18-200mm lens) so getting good shots has not been to hard. But I thought by taking this class I could strengthen my photo taking skills , not knowing that photoshop would be a key part to this class. Luckily I signed up for this class now because the newest version  of Photoshop[ CS5 ] just came out a few months ago.

 My teacher studied under Ansel Adams so he was taught the "old school" way of doing things , and to my surprise is soo into digital and photoshop. [ I kinda thought he would be the kind to want to preserve the original way of doing things ...Guess not!]  The book the teacher has us using is The Adobe Photoshop CS5 Book for Digital Photographers by Scott Kelby  [ here is the link in case your interested..] There are some fantabulous fast and easy tricks for editing your pics.

Ok, here is where I am going with this. My Brother-in-law, Nephew, and Mother-in-Law came to visit and all I could think of was to get the kids to the park and take some pictures. Of course the kids were up for it , not knowing my hidden agenda! We have been having some awesome weather and I couldn't have asked for a better blue sky day to take picture. Here is what I got. I will show you the before and after editing.. Its just amazing.... to me..I think... In my opinion..!


My Beautiful Lily with static cling hair.. Before and after. I am soooo Not claiming to be any kind of professional at this. I am just sooo excited about having this program and what it can to!


Here is Chaser before and after [please do no mention the hair doo, we are working on it!]


Again, lily she is so easy to take pictures of! Here I added a little more exposure which blew out the background so I went in my by brush tool and lowered the exposure for the background. Sounds technical, but it is so not!


 My little oocy I Love her Little face!


 Eating a Cheetos


I adore this shot of my Nephew. This was the best shot of the day!


So here is another hobby I have found to spend time on. You should Never eva , eva, eva ,eva , eva hear me say I have nothing to do or that I am bored!

~ Bianca

Thursday, November 11, 2010

Organizing and crafting all in one..

Last weekend I felt the strong need to organize my craft space in order to prepare the holidays. I usually have a list of projects I want to do, a few new ones and and few old timers. So anyway , I decided I needed to get some new kind of new storage containers for my yarn stash. This seemed like the easiest place to start . I went to Michaels because baskets were 40% off last weekend, but did not find what I had in mind ( I also did not want to spend a lot on this endeavor). On my way home I had a flash of an idea, don't you just love it when that happens! I went to Wally World ( aka Wal-Mart) and bought some clear plastic containers, but of course they could not stay this way. I did not take a picture of them in their original state, but you can imagine how they looked...boring!


So,  to make these super fancy  I  decoupaged some vintage word flash cards around the entire bin so that you cannot see what is inside (my super hot mess of yarn that I had to buy now not knowing what to do with it but it will someday be something !) .


This is one of my favorite things do. I Love these flash cards, I have multiplication , division, addition and site words cards all bought on Ebay. I have had to stop myself in on gluing these cards on to everything! I have some more ideas of where to put them that will tie in to these storage bins (maybe to come at a later date).


I also added some blackboard paint  I had  hanging around to the center so I could label what was in the bin.


So that is where I started, and since I had my Mod Podge out I started to work on a couple of projects that had been sitting on the To-Do list.


Here are some Ikea mirrors that have waiting for something fab to happen to them. I started  collecting game pieces awhile ago [one of may collections I have]  and thought this might be a fun way to display them.  I used Mod Podge once again since I already had it out and just simply glued them on to the frame surrounding the mirror. The hardest part of this was making sure they lined up equally.


Ta-Dah  below is the finished product, I made a total of three of the domino mirrors and two with  the scrabble tiles.


I haven't decided if I want to
  • Keep them because I love them
  • Give them as Christmas gifts because I know some family members will love them
  • Or sell them on Etsy

What do you think??

~Bianca

P.S. Check out this Mod Podge blog, lots of cute project ideas!