Wednesday, September 12, 2012

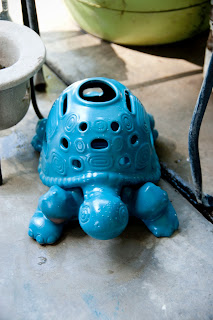
I'm a Blue Turtle


Ive had this guy chilling in my back yard for ever. I'm pretty sure I bought him at a partylite party a bizillion years ago when I still lived in a apartment and only had one child ( ahhh the good ole'days!) Last summer I repainted all my plastic flower pots to add some pizazz to my back yard, but I never/didn't even think of painting this guy who obviously could use some love. 


So out came the spray paint. I always get a look from Mike when I break out the spray paint. Its the look of OMG what is she doing now! And what is going to get paint on it! I was a good girl this time, I got a big cardboard box to do my work in so that the table, concrete, grass, wall would not get painted also. 


Seee, no over spray all over the place. I have to tell you I am a big fan of spray paint! It is so easy even though I have not quite mastered the one light coat at a time technique. 


Here he is all dry and back in his spot ( well not so dry see the little blue spot on the concrete... I cleaned it up the best I could!) So as I was walking back along the side of the house to put the paint away I found some of blue turtles friends. 


Little turtle is missing a leg, but nothing a little paint job wont hide.


Funny thing , the paint totally bubbled a little but  a lot, but it only added to the hey i'm a horny toad look so I didn't mind. 


Here they are, all three homies chilling in the sun. Moral of my story is pretty much anything can look better  or be granted a new life with a little spray paint :-)

Thanks for stopping by!

~ Bianca


Saturday, September 8, 2012

Chevron Purse


Happy Saturday all! Here's a project  I did with this little ditty of a purse I scored at a garage sale for $2 bucks. Hey that's the same price as the shirt I redid last month. CRAZY! This purse has good bones. I saw it as a beach bag at first , but since I only make it to the beach a few times a year I knew I was going to have to spruce this guy up.  


Supplies need for this spruce up if you wanted to try your own
Fabric paint in your choice of color I chose green, blue and white
 { i suspect that acrylic paint could work just as well}
Foam paint brush { one of those cheap guys from the craft store}
paint tray or just a piece of paper to hold your paint


Shhh, don't tell the hubs I did my project on the hard wood floors! I put some newspaper down!


See! I did! SO  for this chevron...i just went for it! I thought about trying to make a chevron stencil to make it "perfect", but my mind was in the " I don't care if its perfect" and " I only have 2 hours to finish this project' mode so go for it. The good thing about this is you can go in and make the lines thicker for make it look a little better if your chevrons aren't as you wish. 


I chose to do one green just a add a little bit more flair. 


The paint it wet here so it looks a little clumpy { does that describe it?!} I did the front and back and  thought I Yay I'm done! You see on this particular day I had started taking a morning class and a friend was watching my 3 yr old  and the other 2 were in school. As mentioned before I had 2 hours to finish before kids return and this took maybe 20 mins.YAY time to myself! Quiet time! All by myself time! 


But when it dried I just wasn't feeling it. It needed something more. So I added a white stripe down the middle of  the blue and green ...... Ta-da! I have been using this for my art class It holds everything! 

 Thanks for stopping by, What are you up to this weekend? 

~ Bianca