Monday, October 3, 2011

POISONED!!


Imagine seeing that after drinking down your nice cold beverage!

I saw this on Pinterest of course. LOVE me some Pinterest. I have to go out of my way to avoid it so that I can get my daily chores, Homework ( taking an online history class ) and other craftiness done!

Here is the link to the original. I was going to do it there way but I wanted to make this as a gift for my younger brother and wanted to make more than one. The original is a little bit ..ummm.. lets say cleaner than mine?! But I know the way I did it took way less time and turned out just as cute ( if not cuter!!)

Supplies needed to do it MY way..
1. Dremmel.. I used an etching tool that came it the kit of accessories my hubbie bought me. It was metal and had a large ball at the end of it. They had a smaller version but the larger one seemed to work better.
2. Glasses, I got these at TJMAXX. They were $7.99 for the set and I picked ones that had a pretty large bottom for etching on.

3.Safety goggles

4. Sharpie

5. rubbing alcohol for cleaning off the glass


Next I wrote out what I wanted to etch..Note to readers you will have to do this backwards!!


Then get to etching, this is kind of scary at first but it gets to be fun once you get into it!


That's it, all she wrote, soo simple. Just clean off the glass with your alcohol and your done!


Took me maybe...45 minutes to do all these

Here are some other etching projects Ive done. These go back a couple of months, just never got around to telling ya about them! Sorry!


Tea light holders from Ikea, gotta love. So user friendly.  I got this idea form this book , it was on my list of Craft-o-lution projects, which I am soo behind on!! Of course!!


Here is one in the works too, maybe I will get it done soon so I show it off!


Its the lyrics to one of my favorite songs by the Beatles  " when I'm 64"  I'm about half way done. I think i have a fear of growing old so this song really hits home! LOL

Until next time.. Signing off and welcoming the cooler weather!!

~ Bianca


Sunday, September 18, 2011

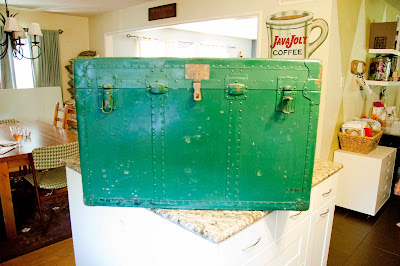
Trunk Space

I Bought this at my favorite pickin hole for $30 smackers.


 I have been sworn to secrecy by the person who introduced me to this fabulous place, not to tell anyone where it is! We don't want anyone buying up all the goods.

I have been looking for some kind of new coffee table. Right now I just have an old ottoman that I pretty much have to recover every year because I have three kids ( and you know the rest of the story!)

So I had my trusty assistant add these


and I did this


I also glued some of the chipping paint on the top , because I knew little fingers were gonna pick at it.

Then I sprayed the whole thing with a glossy clear coat.

and I got this


a place for my magazines to rest


a place to leave the remote so others can find it!


and a place to kick up your feet after a hard day and not worry about scratching a new coffee table I was thinking about getting..


Oh MY!  I totally forgot about the other trunk I bought! It was a few months back, but equally cute enough to be included! 


This one I got a Goodwill for again $30  must be my lucky number

I didn't do much to this one except clean it out with a nice all purpose cleaner, and spray it with a ton a febreze,  it smelled really musty! Gotta love Febreze  got it smelling all nice and I move it to its new home

My side of the bed of course!


my dressing corner, I love that stool. It was given to me by a neighbor who moved. She knew I love it only cause I threatened to steal it every time I came over.


I needed a bigger place to put all my necessities..


Hope your having a nice weekend.. More to come I promise!

~ Bianca


Friday, July 8, 2011

Flash card decoupage desk

I bought this desk.....
well my husband bought it for me  under my guidance
 from target online for my birthday a few years back.


I use it for all my project needs painting, sewing, etc, etc... what you cant really see it all the paint and glue on it. Plus I am just bored of the plain black surface, and from previous blogs I kind of have a thing for flash cards. Can you guess what happened next!


Here is a little explanation of how

I had some spray adhesive laying around from another project,
and I bought a bunch of flash cards on eBay when I started my obsession. The word flash cards can be pretty pricey but for some reason the math ones are usually in my price range (  I think  people do not like math !?!? LOL )

I first layed out my cards to make sure they would fit and then took them off in that order and started spraying them down


I didn't want to use decoupage to glue them down because for me no matter how hard I try I always get bubbles, I thought this might help with that.. It did the trick

Then after the adhesive dried, I simply decoupaged over the flash cards. I still got bubbles, so I used my paint brush to flatten them out.


I would have like to have tried to epoxy the top, but that would have meant me going to the store and this was supplies on hand project! But I think I could still do that someday, just to give it a try?!?

After two coats and some drying time I put everything back on


Ok. just kidding!
This is what my desk would look like if I had endless space a perfect house and I sat around typing a romance novel

Here is the realness of my office..


Magazines I need to get to and projects in the works ...


everyone needs a bowl of sharpies ,
and a terrarium part deux ( i dont talk about what happened to the first one! It wasnt pretty!)

Now off to find what else I can flash card!!

~ Bianca


Wednesday, July 6, 2011

Repourposed with Duct tape

Hello.. Its been awhile. How are you?
So far it has been one crazy summer. ( isn't that a name of a movie?)

I have a fun little tutorial for you today. If you feel like following along

I took this pink polka dot photo album that I wasnt using


and turned it into this  purple ducted taped " legit" album ( according to my 11 yr old !)


My son is in love with the colorful duct tape. He HAD to have some when he saw it at home depot, so after chores were done to pay back the $4, he started duct taping everything. He made me some flowers , himself a wallet and together we pimped out this photo album.

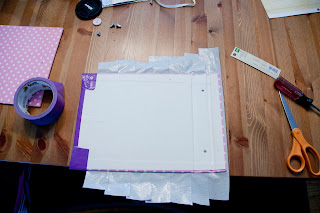
We started by taking the album apart


Then we started taping


Nice and even rows


Once we got done with the front we flipped it over


folded over the excess tape


so it looks like this


and then taped across length wise and cut the tape closed to the edges and smoothed out until it looked like this


repeat for other side, then  feel around for the where the holes are for the screws to re assemble, and poke holes for the screws


we screwed our album back together


and here you are


See nice and easy!
Chase filled it with his photos of school friends he has been collecting and has been showing it to everyone who will sit and look.


Hope you all are having a wonderful summer, and staying as cool as possible!

~ Bianca


Thursday, June 16, 2011

Scarf Winner

Hi all, today is the day!  I get to announce the winner of the scarf giveaway! Thank you all who left comments and became followers.
SOOOO....

The winner is....


2Dy4 !!  

Thanks again for all those who liked the scarves!!

~Bianca

Tuesday, June 14, 2011

Summer scarves part Deux


Well the hot has arrived! OK, so it hasn't been that bad, but it has been a lot warmer around here.

I had so many ideas for these summer upcycled t-shirt scarves that I thought it might be better to split the post into parts rather than overloading you all.


Above is one that I silk screened with a image of a young Bob Dylan.

I don't use the traditional form of silk screening, with the frame and the silk etc.
{pictured below}


Here is an example of the kind of screen I use.


 I found this..actually I saw  an alternative way being done on a craft show a few years back and loved it. The company I buy the screens from is called EZScreenprint.com
{They have a kit you can buy if you are interested. I spells out all the how to's you will need to make your own.}

I have tried the traditional way, and I find this way to take alot less time.

For this you will need
1. Premade screen
2. Fabric screen printing ink
3. Squeegee
4. fabric to screen print on
5. Iron

I took my premade screen and squeegeed the ink over it, being careful to not go over the edge.


Slowly take the screen off and Ta Dah.. I did four prints around the scarf. It is a really fast and easy as you can see, the hardest part is making sure the ink is on evenly. But some times if the ink isn't even it adds to the charm of the piece. Gives it that aged look we all love!


Wait until the ink dries and iron the image for about 2 minutes, Wash in cold water and line dry...

and this is what ya get


I think this may be going to my brother for his birthday at the end of the month..

Another idea I had was to use fabric paint  {I was feeling the cubism this day!}
I found my paint at Beverly's for about $1.99 pr. bottle


I used paint in purple, green, blue and pink. Once dry iron for 2 min , wash in cold, line dry and you are set.

OK, last but not least..How about bleach pens to draw on your scarf?? Ooo fancy!


I stretched the scarf over a wood board that I had and went to town drawing some swirls and dots.


I let the bleach sit until I saw that it was starting to do its job and then waited a little longer, and longer . In this case I let it sit a little to long and by the time I washed it out it ended up looking like this...


I tried again, and this time once any sign of turning white I rinsed it out


A little more detail!

Opps I forgot, I have one more to show..


This was already printed on the t-shirt so I just cut around it!


So which is your Favorite?? I would love to know, or see pictures of your summer beauties!

P.S  there is still time to enter you comment and check out my Guest post on Bles-id from last week for a chance to win on of the Tye Dyed scarves! Contest ends Thursday!!

Thanks for stopping by

~ Bianca